Friday, February 24, 2012

Old Fashioned Lemon Bars

I love lemons! Lemon bars, lemon candy, lemonade, lemon colour, lemon scent.... the list could go on and on. Every time I slice into a lemon, the delightful aroma of citrus brightens my mood. The distinctive sour taste of lemon juice adds the perfect tartness in many dishes. There is something definitely cheerful about the scent, colour and taste of lemon which is way I decided to make old fashioned lemon bars today. These sweet, tangy, lemon bars will lift anyone's mood especially during these long winter days when we all need a little cheerful boost!! Beside that all of us can use an extra dose of vitamin C right? 


I found a really great blog all about lemons, click here to visit  Lemon Mania.comLemons are rich in Vitamin C. A lemon holds between 60-100mg of vitamin C depending on the size and quality. The recommended daily dosage of  vitamin C is somewhere between 75 mg and 90 mg. One lemon in your diet everyday will take care of your body's daily need for vitamin C. I always use freshly squeezed lemon juice when I make these bars, 8 fresh lemons to be exact, so there is no need to feel guilty about having a bigger piece.   


These old fashioned lemon bars are one of my favorite desserts to make because they are so easy to make, they require few ingredients but more importantly because they are made with fresh lemons :) Consider these tart lemon bars your new go-to recipe.  I found this recipe in a magazine and modified it to my liking. When life gives you lemons, make lemon bars!!


~ Old Fashioned Lemon Bars ~


   Ingredients for the crust:


1 1/2 cup butter diced & softened
2 cups all purpose flour
3/4 cup icing sugar
1/4 teaspoon salt


6 large eggs plus 3 egg yolks
3 cups sugar
1/2 cup all-purpose flour
1 1/2 cup fresh lemon juice 
(from about 8-10 lemons)
1 teaspoon grated lemon zest


The zest is the yellow outer part of the lemon. The zest contains the aromatic citrus oils and adds extra tang and flavour.Use the side of grater with fine holes to grate zest. You can zest all the lemons at once, use the amount you need and store the rest in a ziploc bag in the freezer. * 


Preheat the oven to 350*. Grease a 9 x 13 inch pan with vegetable oil and line with foil, leaving a 2-inch overhang on all sides, grease the foil with oil. If your using a pan that you can cut lemon bars right in the pan without ruining the finish you can skip the foil. 

Make the crust:

In the bowl of your mixer combine, flour, icing sugar, salt and butter (cubed). Mix on low till flour is almost incorporated. Mix on medium-high for 1-2 minutes till the dough comes together and is crumbly.   


Press evenly into the bottom and about 1/2 inch up the sides of the prepared pan, making sure  there are no cracks.


Bake until crust is golden, about 20 minutes.


Make the filling:

While crust is baking, whisk the whole eggs, and yolks, sugar and flour in a bowl until smooth. Whisk in the lemon zest and juice. Remove crust from the oven. 


Reduce temperature to 300* degrees. Pour the filling over the warm crust and return to oven. 


Bake until filling is just set, 40-45 minutes. Let the bars cool in the pan on a rack, then refrigerate until firm, at least 2 hours. Cut  lemon bars in right in pan or lift bars out of pan using foil, remove foil and slice. Dust with icing sugar before serving.


Make some lemon bars and spread some cheer :) 


Tart, lemony perfection in one slice!!


Shortbread crust, delicious tangy lemon filling, lightly dusted with icing sugar!!


Have a great weekend


 Thanks for stopping by!!


Pin It

Tuesday, February 21, 2012

Apricot Piroshki and Kolachki....the art of baking!


One of the earliest memories of baking in the kitchen with my mom was that of making apricot piroshki and kolachki. I remember when all I was allowed to do was to make my own little sweet dough designs, which my mom baked and I got to eat. They weren't pretty that's for sure but I was proud of them. I use to watch with amazement as my mother's nibble hands cut out sweet dough rounds, filled each round with fruit filling then twisted and knotted the sweet dough into intricate designs. At that age I never imagined that one day I would be making them myself. 


Eventually I graduated from the egg wash apprentice to making these apricot piroshki all by myself. It was a learning processes that left me with many fond memories of baking in the kitchen with my mom at an early age. Maybe some of you may have had a similar experience making these delicious, sweet, and scrumptious goodies. If so you won't need any explanation on how yummy these apricot piroshki are. If you haven't made them before well there's no better time to start than today. 


I had a few requests for this recipe so today I'm going to share it with you. These are good to make anytime of the year but I think that a cold winter's day, when the snow is swirling outside, is the perfect time to stay inside and make these delicious sweet dough pastries. The house will be filled with the smell of sweet dough  and apricots baking. The oven will warm your kitchen, and the apricot piroshki will warm your soul. So while these pastries are baking in the oven, close your eyes and let the soothing smell of apricots take you away to warm summer days when these sweet tangy fruit are ready for picking. Unfortunately it will be a short trip because before long the oven timer will be buzzing you back to reality. Get your mixing bowl out and start making some memories in the kitchen today:)


~ Sweet Dough ~

 Ingredients:

1/2 cup warm water
1 tablespoon yeast

Pour the warm water into a small bowl, sprinkle the dry yeast onto the water and set aside to develop. Yeast will dissolve, foam and become bubbly when ready. 

7 cups all purpose flour
2 1/2 cups warm milk
4 tablespoons melted butter
1 Tablespoon olive oil
1/2 cup sugar
1 teaspoon salt
3 eggs (room temperature)

In a large mixing bowl combine warm milk, melted butter, olive oil, sugar and salt. Add eggs and blend mixture well. Add the developed yeast mixture and stir to combine. Start adding flour one cup at a time. You can use a wooden spoon but I find that stirring in the flour by hand works best. Add flour until you have a soft, sticky dough. You may need to adjust the amount of flour you add, therefore don't just add the whole amount at once. It's better to have a softer, sticky dough because you can add more flour when your kneading the dough. If you add too much flour the dough will be tough and stiff. Your pastries will not be as light, fluffy and soft if the dough is to stiff.  

Once you've added enough flour to make a soft dough, turn the dough out onto a lightly floured work surface. Knead the dough, until the texture goes from soft and sticky to smooth and pliable. Tuck in edges of dough, shaping it into a ball   Lightly oil the bowl and place gently place the dough ball back in the bowl (seams down). Covered the bowl with plastic wrap and a clean dish towel, put in a warm place to allow dough to rise and double in size

~ Apricot filling ~

500 grams dried apricots
2-3 tablespoon water
1 cup apricot jam
Sugar to taste - optional

Place apricots and water in saucepan. Bring to a boil, then turn down to low and cover with lid. Let the apricots steam for about 10-15 minutes Until apricots are soft and plump. Puree the soft apricots in a food processor until smooth.  Add 1 cup apricot jam, stir into pureed apricots until combine. Your mixture should be a smooth thick paste. I find that the jam adds just enough sweetness but if you find it is to tart then add sugar to taste. Reduce jam to 3/4 cup if adding sugar. Don't make filling to runny as the filling will run out and all over sheet when baking.  


~ Prune filling ~

500 grams dried prune
2-3 tablespoons water
1 cup plum jam
Sugar to taste - optional

Make the prune filling follow the same steps as above. If you want to make piroshki with both fruit filling cut the ingredients for the filling in half and make half a batch of both kinds. Any leftover fruit filling can be frozen for up to 1 month or just enjoy on toast. 


~ Egg Wash ~

1 egg

Beat egg until light and frothy. Use a brush to apply to sweet dough pastries. Set aside until needed. 

********************************************************************************

How to make Apricot or Prune Piroshki


Make the fruit filling before you start making the sweet dough, this will allow enough time for the mixture to cool. After the sweet dough has risen and doubled in size it's time to start making the piroshki. Gently cut the sweet dough into 4 pieces. Roll each individual piece out at a time, on a lightly floured surface to 1/4 inch thickness. Cut out circle using a round cookie cutter. The size of the cookie cutter is optional. 


Once you've cut out the circle, place a tablespoon of fruit filling in the center in an oblong shape. Cut slits on either side of the filling not to close to filling and not to close to edge. Gently pull out the cut dough edges and twist the dough in your fingers, crossing the twisted piece over and through each other. Pinch to outer base. Place on a lightly greased baking sheet.


 Keep working on the rest of the dough, to allow the piroshki to rise again. Once you notice the the piroshki have risen (approximately 1/2 hr, the piroshki will be puffy and doubled in size) brush with egg wash. Place in oven at 350 degree Celsius. Bake 15-20 minutes until golden brown. Remove from sheet with spatula and let cool on wire rack or clean dish towel. 


How to make Kolachki

After the sweet dough has risen and double in size it's time to make kolachki. Gently cut the sweet dough into 4 pieces, Take each piece and roll gently into a log about 1 inch in diameter. Cut the long shaped dough into 2 inch long pieces. Take one piece at a time, round out into a log shape, gently twist each end opposit each other to create a rope like twist design. Then shape the twisted log up and into a circular shaped design. Tuck the ends in and under, place on a lightly greased baking sheet. 


Keep working on the rest of the dough to allow the kolachki to rise again. Once the kolachki have risen (approximately 1/2 hr, and doubled in size) brush with egg wash. Place in oven at 350 degrees Celsius. Bake 15-20 minutes until golden brown. Remove from sheet with spatula and let cool on a wire rack or clean dish towel.


You can use this sweet dough to make so many different sweet baked goodies. Roll the dough out and sprinkle with cinnamon, sugar and walnuts/raisins to make scrumptious cinnamon buns.


 Get creative and make a filling out of your favorite fruit. You can make sweet buns sprinkled with sugar or drizzled with honey.  Once you've master making this sweet dough your on your way. Maybe you have a favorite sweet dough recipe of your own, use it to make these apricot piroshki. The choice and options are endless! Start making some memories in the kitchen with your loved one. 
I once read that Baking involves all the senses - touch, taste, sight, scent and even sound ( ever hear bread crust crackle as it cools?) There are few things more soothing than the aroma of bread baking or the sweet scent of cookies after a long day at school. 


This is the Art of Baking at it's best, right in your own kitchen.


It was a beautiful winter's day today. The snowflakes were so big and fluffy


Your never to old to make a snowman....


Icy beauty.....


Frozen Crabapples.


Thanks for stopping by,


Love Katya


Pin It

Wednesday, February 15, 2012

Belyashi

Pin It

Беляши - Belyashi

Have you ever eaten something when you were just a child and all you can remember is how good it was? You may not even remember how it tasted exactly but you just have a memory of it being so delicious. Well my mom use to make these delicious deep fried pastries with a beef filling called Беляши/ Belyashi. 


They are made with a soft yeast dough and have a meat, and onion filling in the center, deep fried till golden brown perfection. All I had was childhood memories of eating them. I would hint, to my mother, at times that it sure would nice to have them again and then.....my wonderful mother surprised me this year for my birthday and made them! Yay!! Not only did I get them for my birthday but now that I'm older I decided that I would learn how to make them and take pictures so that I can make them anytime. Even better than that I thought I'd share this recipe with you. Maybe you've had these before and know first hand how good they are or maybe you haven't tried them before. Either way try this recipe out today, hot or cold these Russian meat pastries are so delicious, you won't regret it.


~ Беляши - Belyashi ~

  Ingredients for yeast dough:

1/2 cup warm water
1 tbsp active dry yeast

Pour the warm water into a small bowl, sprinkle the dry yeast onto the water and set aside to develop. Yeast will dissolve, foam and become bubbly when ready. 

While yeast is developing..... 

2 cups milk or water 
1 tbsp salt
3 tbsp olive oil

Combine milk or water, salt and olive oil in a large bowl. Add developed yeast mixture and stir to combine. Stir in 1 cup flour. Continue adding 2-4 cups of flour to make a soft dough. If your not afraid to get messy use hands to add flour, it's easier and you can gauge the softness of the dough more easily. 
Once you've added enough flour to make a soft dough, lightly sprinkle work surface with flour. Knead dough for 5 minutes. Place the dough back into the bowl, cover with plastic wrap and let the dough rise till double in size. While dough is rising prepare meat filling.


Ingredients for meat filling:

1 kg of lean ground beef 
3 large onions
1 tbsp salt or to taste
Ground black pepper to taste
1/2 warm water

Peel and finely chop onions. Place into large bowl. Add ground beef, salt, pepper and water.. Combine mixture thoroughly. Cover with plastic wrap and set aside while you prepare to roll out dough.


Once the dough is doubled in size, cut dough into 4. Rolled out each individual piece with a rolling pin to 1/4  inch thickness . Cut  3-4 inch circle out of rolled out dough, using a round cookie cutter. You can also cut off individual size piece from large dough ball and roll out each piece, making pastries one by one. But I prefer this method It's a lot easier to rolled out one big piece of dough and cut into circle with a cookie cutter (like you would when making rolled out cookies). Less time consuming and less hassle = 👍


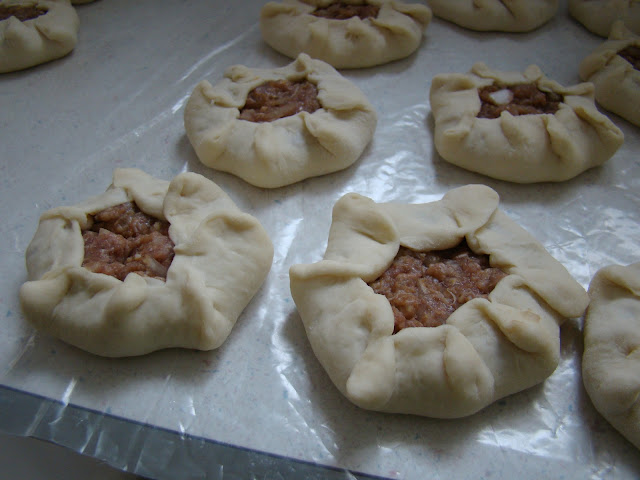
Place approximately 1 heaping tbsp. of meat filling in the center on each circle and gently spread out filling. Stopping 1 inch from outer edge. You need to leave enough room to be able to pinch edged and fold dough in and slightly over the meat filling.


Crimp edges and fold in over the meat filling. Do this all the way around the whole circle, approximately 7-8 crimp and folds. Gently press down to help seal in meat filling. See video below for help. 


Place Belyashi on floured surface or plastic up-cycled cereal bags, while waiting for the deep frying oil to come to temperate.


*Check my up-cycled cereal bags tip here I use them to roll out cookie dough too, they come in handy for a lot of thing start saving them today!*


  Pour 2-3 cups vegetable oil into a deep frying pan and heat oil on medium to 175-190 degree Celsius. Place Beylashi face down in hot oil gently. 

*Be careful not to splash hot oil on yourself*

 Fry face down till edges are golden brown, then turn over with metal tongs. 


After you turn the Belyashi, fry the bottoms till golden brown too. Remove from oil with metal tongs. Place on paper towel face down at first to drain oil, then flip them over. 


And just like that the Belyashi are ready to eat :)


 As you can see they're not difficult to make. They don't require a lot of fancy ingredients but they are so delicious, if I could add taste and smell to my video I would so that you could enjoy it. Once you've tried them, you'll be thinking and longing for these delicious savory pastries until the next time you make them.


Enjoy your Belyashi........

Приятного аппетита!


Thanks for stopping by and have a wonderful day!


God Bless You,
Katya


Pin It

Thursday, February 9, 2012

Cookie Love

The best thing about a special day like Valentine's Day is that  I get to experiment with new cookies designs that I've never tried before. I finally got to put my frog shaped cookie cutter to use. I made Froggy Love Valentine's cookies.


Froggy went a courtin'......

I made a double batch of  sugar cookie dough because I had a few cookie ideas I wanted to try out. These Froggy Love cookies were so easy to make. 

Bake a batch of your favorite frog shaped cookies, click here for my favorite sugar cookie recipe. Also make a batch of royal icing, found here.  I coloured some royal icing kelly green, yellow and black. With flood (corn syrup consistency) green royal icing, outline the frog shape cookie then fill in right away. Use yellow flood icing to make belly and spots. Let the icing dry for about 1 hour, then pipe thinned white royal icing for the eyeball. Let cookie dry up to 8 hours or overnight. 


There are a lot of great blog sites out there with tutorials and tips on how to decorate with royal icing. I have my own techniques which work for me but one site that is really great for royal icing tips is Sweetopia. I use the same technique she does. She outlines and flood with the same consistence icing and I think this gives a even, thick, coating. Other's use a thicker consistency on the outline and then flood inside with thinner icing. I don't like the outlined ridge that it makes :( 

Actually if I'm in a rush I skip the outline and just use a thin spreader and cover the cookie with icing by spreading the icing to edges. Consistency is very important if you do it this way because there is no outline to stop the icing from running over the edges if the icing is to thin. I usually resort to this when I'm doing a solid colour on a basic shaped cookie, a large amount of the same design or covering the icing with a decorative design. 


I did these 3-D Teddy Bears without outlining first and you can see that the edges aren't very even :( It does works but it takes a lot of practice and patience. I'm still learning myself all the time, that's the best part because it never gets boring :) My best advice is practice, practice and practice. Do what is most comfortable for you and if you mess up, well do what I do. Feed those to the family, they never complain....if they know what's good for them. (lol) 

Anyways back to the froggy's.....once the icing is completely dry, dust cheeks with pink shimmer powder. Draw a mouth on with edible black marker. I added little heart sprinkle for lips. Then with Wilton tip 2 make frog leg markings and arms with leftover  green royal icing. Also add black royal icing for eye centers. Let the icing dry completely.


The result is some very cute froggy cookies!


I also had a hugs and kisses cookie cutter I wanted to try out.....


And..... remember all those rolled fondant roses I made? Well I decide to use some of them on heart shaped cookies. I flooded my heart shape cookies with pink coloured royal icing, let them dry for an hour or two, then added a lace design with white icing. Once the cookies were dry I filled the centers with fondant rolled ribbon roses and leaves. If you want to try making some ribbon roses click here for a simple tutorial. 

 I also flooded some simple flower shape cookies with pink icing and added a lace design. I saw this lace design on The Sweet Adventures of Sugarbelle and  I'm so glad I tried it. It's a great way to make a simple cookie look fabulous.  Check out her blogsite, her cookies are stunning.


Making extra ribbon roses is always a good thing, it turn any simple cookie into a beautiful work of art. Next time you have some leftover fondant don't throw it out up-cycle  it into some ribbon roses.


Seeing as I had red ribbon roses......I made some white, black and red cookies too !!


I'm having a hard time deciding which ones are my favorite.


No troubles deciding who to give them to though. 


Happy Cookie Making :)


Thanks for Hopping by!                

Smiley Face


Pin It