
A cute little girl named Ainsley turned 2 years old a couple day ago. Two-year olds are full of energy, enthusiastic and exploration. And so when her mom and my friend Nicole asked me to make Dora the Explorer sugar cookies for her birthday party, I thought they were the perfect choice.
 Not only does she love Dora but she's an explorer herself at this age. Running around, learning new skills and checking out all the thing her wonderful life has to offer.
I'm always checking out my two favorite on-line stores for new cutters and supplies, Cake Mischief and Golda's Kitchen, but I've never noticed a Dora cookie cutter. So I decided to make my own templates of Dora the Explorer using the same technique I used when make the Lego heads. Check out the Lego heads link for detailed instructions on how to make plastic cookie templates. They're really easy to make, cost free and work well when you need a certain cookie design and can't find a cutter for it.
First thing I did was find a Dora face that was a suitable choice. Then I printed it and cut out the Dora face.

I traced the cut out Dora face onto a plastic margarine lid with a permanent black marker. Then I cut the traced face out of the plastic lid. Super easy so far....right? Keep the paper cut out of Dora's face, you'll need it for later.


Make a batch of your favorite sugar cookie dough or click here for my favorite sugar cookie recipe. Roll out the cookie dough, I always use reycled plastic cereal bags and roll out the cookie between two clean cereal bags. It`s an easy, mess free way to roll out sugar cookie. The great thing is that by not adding any flour when rolling out the dough the texture of the sugar cookies never change till the very last bit is used and it`s envirometally friendly too!!


I'm always checking out my two favorite on-line stores for new cutters and supplies, Cake Mischief and Golda's Kitchen, but I've never noticed a Dora cookie cutter. So I decided to make my own templates of Dora the Explorer using the same technique I used when make the Lego heads. Check out the Lego heads link for detailed instructions on how to make plastic cookie templates. They're really easy to make, cost free and work well when you need a certain cookie design and can't find a cutter for it.
How to make a Dora the Explorer cookie template:


Ta-Da!! A perfectly usable Dora the Explorer cookie template!

Make a batch of your favorite sugar cookie dough or click here for my favorite sugar cookie recipe. Roll out the cookie dough, I always use reycled plastic cereal bags and roll out the cookie between two clean cereal bags. It`s an easy, mess free way to roll out sugar cookie. The great thing is that by not adding any flour when rolling out the dough the texture of the sugar cookies never change till the very last bit is used and it`s envirometally friendly too!!
Gently lift the cut out cookie shapes onto a lightly greased cookie sheet with a spatula.

Cut out and bake your desired amount of Dora the Explorer cookies. Let them cool on a wired rack.


~ Decorating Dora the Explorer Cookies with Royal Icing ~
Make a batch of SweetBakedLove's Royal Icing. Cover the royal icing with saran wrap and a damp clean towel. Set aside. Next I checked out a few coloured Dora the Explorer pictures. I want to see what colours were used for her hair and face before I coloured the royal icing. Once I had a good idea of what colours I needed I coloured the royal icing using Wilton food gel colours.
I used these Wilton food gel colours:
Brown
Black
Ivory
Red
Pink
I used to different shades of brown, the lighter shade was used to outline her hair style, bangs and for eyes. I ouline the hair style with the lighter shade of brown let if set for 5-10 mintues and then filled in with the darker shade of brown.
The darker shade of brown was used to fill in the hair colour and to draw the outline for her eye, nose and mouth.
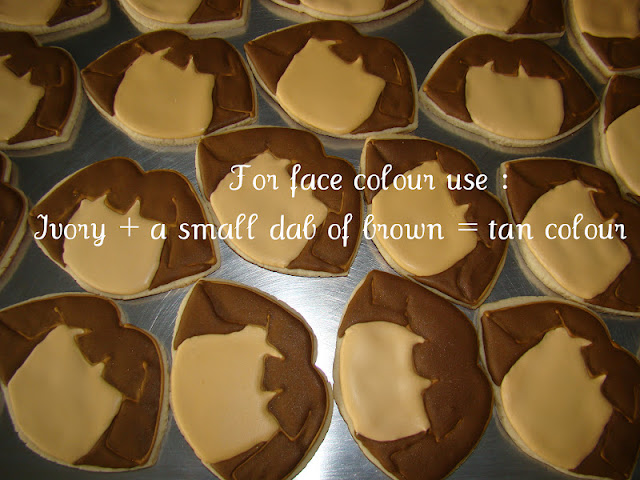
Let the icing dry for 30 minutes. Once the hair has set up a bit start filling in the face with tan coloured icing. I made the face colour by colouring the royal icing ivory first then adding a bit of brown colour with a toothpick until I reached the desired shade for her face. Taking the time to study the images of Dora online is helpful for this part then you can more accurately gauge what colour and shade is needed for her each face.

Let the hair and face icing dry completely 8hrs to overnight. Once the icing is completely dry then you can continue adding facial features. For this step I use a technique that I learned Calleye of The Sweet Adventure of Sugarbelle. She calls it the Push Pin Trick click here to check it out. It's a great way to transfer details onto a cookie and get the exact placement :)
Remember how I said to keep the paper cut out of Dora's face well you'll be needing it now!! Wash and thoroughly dry a push pin.

Place the printed out Dora face over the dried iced cookie and transfer the facial feature by using the pin to prick little tiny holes in the icing outlining the eyes, nose and mouth. I used a longer needle thinking that it might not make as big pin prick holes but I'm not to sure if it did. But no biggy it still total worked!!

She kinda looks creepy at this stage doesn't she? Just wait till you add all the different colours to make her eyes and mouth though you'll be so glad you used this technique it's awesome and it works!!
Once you've transferred the facial features using a pin on all of the cookies then you can start drawing in the features using coloured royal icing. I used the darker shade brown (same as hair colour) to pipe on all the facial features; nose, mouth and eyes. Allow the piping to set for about 30 mintues. Then fill in the eyes with thinned white royal icing. While the white icing sets you can pipe in thinned red icing for her mouth. Wait 15 minutes and then pipe a round drop of the lighter shade of brown for the coloured part of her eyes. Use paper cut out as a guide to determine how big to make the dot. While the eye colour set up, you can pipe a small half moon shape for her tongue, again use paper cut out as a visual guide. Allow to dry for 30 minutes. Last but not least add a small black dot of icing on top of the lighter brown eye center for her pupil. Allow the face to dry completely for 8 hours to overnight.

Dora the Explorer!

Happy Birthday

Hola Amigos!
Thanks for stopping by!
I shared this post at Sweetology: Tea Party Tuesday
She made some super cute Easter Bunny cream puffs, hop over and check them out :)
Love
Katya

No comments:
Post a Comment